Category: DIY

DIY

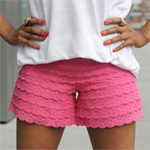
Frugal-nomics DIY: Eyelet Shorts

Being as I comb the internet for DIY inspiration, I’m often seeing and doing projects that require a sewing machine for that polished look….but for this one, I wanted to “level the playing field” for everyone and offer up  something that was super cute, but no-sew.  These eyelet shorts say it all. They are so flirty and feminine, and are great for a date night or brunch with friends.  Check them out! 


SUPPLIES: a pair of old shorts (I used a pair of men’s boxers), needle and thread, fabric glue, lace trim, and scissors. 

HOW-TO: Not wanting to shell out a lot for a pair of shorts, I opted for a pair of men’s boxers I could hand stitch to the fit I wanted. I then rolled the waist down, took in the sides, hemmed them, and hand stitched them to this new fit that I liked. Quick and easy.

1. Take a piece of lace trim and measure around the circumference of one thigh. Cut it. I wanted this first piece to drape below the hem line of the shorts, so add a line of glue and go ahead and set the first piece in place (Note: Make sure the seam is on the inner thigh).
2. Continue to add pieces along the inner thigh — I used four of them.
3. Here you see the four rows I have done around each leg, trying to be careful where the seams lined up in the inner thigh area. Next, you’ll want to start placing entire strips around the entire pair of shorts (Note: I alternated which side my seam was on).
4. It got just a little tricky the higher I went up, so I opted to put the shorts on so I could fill them out and make sure they weren’t too tight. So I kept them on and glued on the trim as I got closer to the waist band. Presto! 


DIY

Frugal-nomics DIY: Sequin Encrusted Denim Shorts

Season after season, denim is just one of those fabrics that never seems to go out of style.  So, I wanted to do something unique with it — I wanted to play with textures a bit. So…..I took some of my leftover sequin fabric that I had from the backless crop top inspired by Rihanna, and I combined the two fabrics to add a chic touch that would definitely dress up my “blues.” Tell me what you think!


SUPPLIES: Denim shorts (mine were pants I got at the Goodwill), scissors, straight pins, needle and thread, pencil, tracing paper (I just used some old tissue paper I had), and sequin fabric.

HOW-TO:
1. Take your tracing paper and pencil and draw an outline of both the left and right sides of your shorts.
2. Cut out both of those forms — they will look like this. Feel free to mark a tiny “L” and “R” on them to keep them straight.
3. Turn your fabric face down, and then pin your patterns face down onto the back side of the fabric. Cut them both out.
4. Take your sequin forms you cut out and lay them on their respective sides. Next, take your scissors and cut out a notch for the belt loop.
5. Now, hand stitch your forms into place. Be sure to pay special attention to the outer perimeter of each form….you’ll want it to but up against all the seams of the jean’s edges.  (Note: while I didn’t picture it, feel free to add some e6000 glue around the edges first if you want a little added security before stitching). Here you go!

DIY

Frugal-nomics DIY: Metal Chain Necklace

Gone are the days where you’re only allowed to wear one metal at a time.  With this necklace I was able to combine a bunch of my favorites….metal chain….spikes….a few crystals….all fun.   Throw caution to the wind and try this rocker chic favorite.   It’s bold. It’s functional….and it definitely stands out! Tell me how you’d pair it.


SUPPLIES: Assortment of metal chain, a closure, safety pins, spikes, needle and thread, needle nose pliers, and a pair of wire cutters.

HOW-TO: 
1. Take some wire cutters to make a break in the clasp — be sure to be careful not to do so at the bottom of the loop so as not to have chains slip off. Then pry the ring open with your pliers.
2. These chains are really easy to attach to the master ring, but the crystalized chain requires as extra step.  So, use a matching thread to stitch together the ends of the crystalized chains.
3. Add a safety to ends of the chains that don’t rings. Remember, you’ll cut all your chain the same length; taking into account those chains that have safety pins.
4. Take one strand of the pink chain and add 7 equally spaced spikes.  (Note: Feel free to add a dab of glue inside the spike’s end cap if you feel you need extra security).
5. Add all of your chains to one side of the closure ring (Note: Ok, so its really easy to get the chains a little jumbled, so I laid them out to keep them all organized.
6. Collect the group of chains, add them to the second closure ring on the opposite side, and give the group a twist. Keep the pink chain with studs and the two strands of black chain, separate.
7. Keeping the single pink strand with studs and the black chain straight (no twisting here), add them also to the closure ring on the opposite side and close the second ring.