Category: DIY

DIY

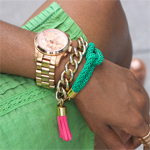
Frugal-nomics DIY: Cord and Chain Bracelet

This summer I’ve been making more jewelry to mix and match with different looks.  And I gotta say, nothing beats the pride in saying you made it yourself when others tell you they like it.  Definitely more pieces to come. Tell me what you’re proud that you made in the comments below.


SUPPLIES: Metal chain, colorful cord, 2 pair of pliers, a tape measure, wire cutters, 3 jump rings, lobster clasp, 2 end caps, e6000, and scissors.


HOW-TO:
1. First you have to decide what length you want your bracelet.  I want mine to be about 7 inches in total, so the cord part of the bracelet will be about 4 inches (both halves 2 inches each). Go ahead and cut the first piece.
2. Cut a second piece equal in length.
3. Squeeze half a cap full of glue into the end cap (be careful not too add too much, you don’t want it to ooze out onto the cord).
4. Fold the first piece of cord in half and squeeze both ends into the end cap.
5. Slip the second piece of cord through the loop of the first cord.
6. Now, repeat Step #3 with the second cord.
7. To complete my 7 inches, I’ll need about 2.5-3 inches of chain.
8.With wire cutters, cut the desired length of chain.
9. With both pair of pliers, carefully open up 3 jump rings.
10. Take one jump ring and place it on one end of your cord connection, then attach your chain and close the jump ring.
11. At the end of this chain, add one more jump ring and a lobster clasp, and then close that jump ring.
12. On the opposite end of the cord connection, add a final jump ring, close that one up….and you’re all set.


DIY

DIY: Sequined Backless Crop Top Inspired by Rihanna

Whether you’re a fan or not, we gotta agree Rihanna has had some serious style in the past few years that makes her stand out on even the most casual of days.  I recently spotted a glitter backless crop top Rihanna wore in London to watch her brother spin some tunes (he’s a DJ), and I was all over it.  I took to Mood for a yard of sequined/shell fabric (sans the disco ball glow), and immediately got to work….and I gotta say, after wearing this shirt for the very first time, it’s definitely a head turner.


Sequined Backless Crop Top Inspired by Rihanna 2

SUPPLIES: Sequined/shell fabric (I got 1 yard ), garment with sleeves you like, needle and thread, 1 hook and eye, pen, spray adhesive, tape measure, straight pins, scissors, sewing machine, and a pattern (I tweaked one, I got from this site).

Sequined Backless Crop Top Inspired by Rihanna 3BHOW-TO:
1. Print out crop-top tank pattern from this site, lay it all out, and tape it together.
2. Cut out the pattern for the front and the back of the tank (you’ll add your sleeves later).
3. Double up the fabric, and lay out your form for the front and the back of the top along the fold.
4. Pin these 2 forms down to your fabric (pictured is the back of the top, I moved it in from the fold about a 1/4 inch to make room for the seam allowance on both sides of the open back that you’ll cut open later).
5. I wanted my neck a little higher in the back, so I used the scoop of a shirt I had and marked it with a pen.
6. Cut out the front and back.
7. Right sides facing together, pin your top together at the shoulders.
8. Next, place pieces on your machine and sew the shoulders together.
9. Get ready to create your darts — turn front over to the wrong side.  Now, the one on the pattern is below the arm hole (the yellow arrow), but I tried the shirt on to test it out, and they looked better in the chest area (indicated by the red triangle).
10. Pin your darts and sew them (this is how mine looked — I marked them out again by the red triangle).
11. Right sides facing each other, pin the sides together and sew the right and left sides of the top together.
12. Turn shirt on the correct side, and place it face down.  You see the neck hole? Mine was 9 inches across. I cut that number in half (4.5 inches), and placed a straight pin directly in the center. I then followed that up by placing pins along that line, all the way down to the bottom of the shirt.

Sequined Backless Crop Top Inspired by Rihanna 4A

HOW-TO CONT’D:
13. Using those straight pins you just placed as a guide, cut the shirt in half (just the back panel).
14. I was having a bit of trouble getting sleeves exactly how I wanted, so I thought “why recreate the wheel,” and grabbed a dress from the closet, whose sleeves I liked and copied those.
15. Okay, this next part was a little tedious and I had sequins EVERYWHERE…but doing this next step REALLY made the garment look polished.  I cut JUST THE SEQUINS in a row just a little over 1/4 inch on all the raw edges of the top (ie bottom of both sleeves, along the neck line, along the bottom of the shirt, and along the left and right sides of the open back flap). I do it this way, because if you just sew a regular hem, you’ll catch half of a sequin here and there and it will look jagged. So you remove them to make it look neat.
16. Here’s what one of the sleeves looks like laying flat with just the sequins removed along the bottom edge.
17.Take one of your sleeves and fold it in half, right sides facing. Pin it to about 2.5 inches in from the edge that will go unattached from the body of the shirt.
18. Sew the area of the sleeve you just pinned.
19. Turn the top onto the wrong side.  Place one sleeve inside the top, but make sure the right side of the shirt is facing the right side of this sleeve — pin it in place.
20. Now sew the sleeve onto the top.
21. You’re almost done! Okay, so we can’t leave the un-sequined raw edges of the top unfinished. To hem them, now that the sequins are gone, it’s super easy. Lay the top down on some paper and smooth all the loose threads in the downward direction.  Spray adhesive on to just the bottom edge of the shirt, trying to avoid the sequins themselves if you can. (Note: This captures the loose ends of the thread so they stop unraveling and the sequins won’t keep falling off).
22. Fold back all raw edges and hem these edges with straight pins.
23. I opted to hand stitch the hem in place on all raw edges (i.e. the neckline, sleeves, both back flaps, and the bottom of the shirt).
24. Last step, at the top of the back flap, hand stitch a hook and eye on either side as your closure. Congrats, you’re done! Wear your eye-catching top proudly!

Sequined Backless Crop Top Inspired by Rihanna 5

DIY

DIY: Full Circle Skirt

I was recently inspired by a Jean Paul Gaultier for Target dress that my girlfriend wore as a skirt (here’s a pic of another blogger, Rachel Thillen wearing it)–I mean, it was bold, it was sexy, and it was fun.  So, I just had to create my own. It was then that I came across this sailboat printed material, and instantly knew I’d found the perfect palette — matched it with some tulle for volume, and I was on my way.  Tell me what you think below!


SUPPLIES: Iron, charmeuse  (about 2.5 yards), 2-inch elastic band (depends on length of waist; I used about 2.5 feet), tape measure, pen, tulle (about 3 yards) , straight pins, scissors, cardboard, and a sewing machine.


HOW-TO:
1. You;ll need to make a pattern; so take your tape measure, pen, and card board to create your own for your skirt.
2. Next, go ahead and decide the length of your waist by using this equation (don’t worry…it’s really easy): (waist length + 2 inches)/(6.28).  Note: For example, my equation was (25 + 2)/6.28 = 4.299.  Then starting at the corner of your cardboard, take that number (mine was about 4 1/3 inches) and measure it out from one edge, to the other.
3. Connect your dots.
4. Decide the length of your skirt (Mine was about 18 inches). Make sure you are cognizant of the width of your fabric, or you may wind up having to do what I did and tape some extra paper onto your cardboard to complete your pattern.  Measure the 18 inch (or whatever length you decide) line like you did in Step #2, from the line you previously created.
5. Cut out your cardboard triangle.
6. Fold your fabric in half, and then in half again.
7. Place your cardboard pattern on top of your fabric (Note: in my picture, the fold is across the top, and down the left hand side).
8. Since the charmeuse is such a slippery fabric, it may help you to pin the cardboard pattern to the folded fabric.
9. Cut out the form — this is what it looks like when you are finished.
10. Now that you’ve cut your skirt out, you don’t need that original pattern, so you can now use the cardboard cut out to create the pattern for the tulle skirt.  (Note: in my picture I cut off about 2 inches, but wound up only needing one. So, my tulle skirt pattern was 17 inches).


HOW-TO CONT’D:
11. Fold your tulle in half, and then half again, like you did in Step #6.
12. Remember, the folds in the picture are down the left side, and across the top. Cut out the form (Remember, this time it’s 17 inches in length).
13. It will look like this once you’ve cut it out….I individually cut out 6 of them.
14. Lay all 6 forms out on top of each other, being careful to line up the middle circle as best as you can.
15. Using straight pins to secure the form at its north, south, east, and west points.
16. Lay your 6 tulle forms on the sewing machine, and sew one continuous stitch around the top of the waist.
17. It will look like this once you are done sewing.
18. Cut out a piece of elastic the length of your waist plus 2.5 inches (so you can get it over your hips).
19. I want the flat side exposed, so turn the elastic right sides together, and stitch it.
20. Iron a 1/4 seam allowance all the way around.
21. Go ahead and sew the hem.
22. Now, take the waist of your skirt, and your elastic band (right sides out) and secure the skirt to the inside of the elastic. I pinned it initially in 4 spots — the north, south, east, and west points.  After pinning these four points, I then added more pins all the way around the waist band.
23. Sew the band to the skirt….and you’re all set!

While shooting this post, I seemed to have attracted a little fan in the park who also liked my skirt. Her name was Alexis, and the following day was her birthday, so I thought it only befitting to include her 🙂