 DIY
DIY
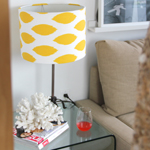
Frugal-nomics DIY: Fabric Covered Lampshade
I’m finding that creating your own personalized home decor has never been easier. So I decided to finally do something with the blank lampshade I’ve been staring at for a couple years now. I knew I wanted something with a splash of yellow that would compliment the throw pillows I had made a while back. So, with less than an hour of time and a yard of fabric, I created a splashy solution that completely brightens up my space. Tell me what you think?


SUPPLIES: lampshade, a yard of light- to medium-weight fabric, scissors, fabric glue, pencil, and spray adhesive.
1. Wrap your lampshade in your fabric, then take your pencil and mark 1.5 inches past the point where the fabric meets the other side.
2. Being conscious of where you want your pattern to lay on the shade, mark 1 inch with your pencil at what will be the top and bottom of the lampshade drum.
3. Cut out your form — it will look like this.
4. Lay out some newspaper, and spray your lampshade with the adhesive (Note: It’s best to do this outdoors; but if you must do it indoors, be sure to be in a well ventilated area).
5. In addition to the shade, spray your fabric with the adhesive, along with dotting it with the fabric glue for added security (Note: I added the fabric glue because I realized my spray adhesive was only temporary).
6. Carefully wrap your lampshade in the fabric — I started in on the seam, so I could end there as well (Note: It was immediately fast drying, so I had a few seconds to play around with it to get it right).
7. Glue along this seam that you started and stopped on, then fold back the flap so you have a neat edge — now press it into place.
8. I wanted my print to line up as best it could….here it how it looked along the seam.
9. Lastly, glue along the top and bottom edge of the drum, and then fold the fabric down, like a hem (Note: If you want it to look really neat, fold it down twice — feel free to use the iron if you need to). Voila!