Tag: DIY

DIY

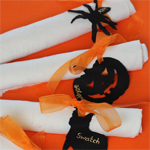
Frugal-nomics DIY: Halloween Personalized Napkin Ring Holders

Growing up I progressively got more and more into setting the table for holidays like Thanksgiving — I mean I would really go all out, hand drying leaves and pine cones from outside, for a finishing touch.  So, it was a natural progression for me to create these personalized napkin ring holders to get in the mood for Halloween.  I mean I saw one cut out of a bat as inspiration, and I totally took it to a new level.  You can add as many shapes and designs that your imagination can scare up — it will be a ghoul of a time. (Corny, I know…but enjoy!) 🙂

SUPPLIES: 1/4 yard of felt, silk organza ribbon (close to a yard for each place setting), fabric paint, straight pins, scissors, and a print out of all the images you want to use (I used Google Images to find some cute ones!!!) 

HOW-TO:
1. The first step is to find silhouettes of pictures you want on Google Images, print them out the size of about 1/4 of a page or less, and then cut them all out.
2. Take your organza ribbon and cut a piece for each of your place settings (Note: be generous so you can have a nice size bow — mine were each 31 inches long).
3. Using straight pins, attach each image to your felt.
4. Go ahead and carefully cut out your images.
5. In the spot you’d like your ribbon to run through your felt “character,” make a tiny incission (about an 1/8th inch) with your scissors. 6. Take the nozzle of your fabric paint, and carefully spell each name of your guests. (Note: I would practice first to gauge how fast paint comes out when you apply pressure to the bottle, because in the event you mess up, you don’t want to have to start all over). Let dry for a few hours.
7. Slip your organza ribbon evenly through the incission you made in Step #5, and you’re all done! 

Uncategorized

Tassel Bracelet DIY Workshop

Last night I hosted a great Tassel Bracelet Workshop with a fun group of guys and gals at The Schermerhorn. We had cupcakes, some beautiful fall colors for our bracelet tassels, and an abundance of chain — what more could we need?! We had so much fun that they were inquiring if it would be a weekly thing! So, not one to disappoint, I’m already cooking up ideas for our next event. Whether they were making a Tassel Bracelet for themselves, or using one of the cute boxes provided to make it as a gift, they were all smiles learning to “do it themselves.”

DIY

Frugal-nomics DIY: Reversible Denim, Leather, and Canvas Tote

So, the way I see it, I’m always a source of free advertising — a walking billboard if you will — for other companies; there’s my Marc Jacobs tote that I will carry til it falls apart, or I have a few random totes in my closet that I carry in addition to my purse daily. Because let’s face it…living in this city and being a freelancer you have to be prepared for everything on a moments notice. I carry stuff like my makeup bag, my iPad, extra shoes and outfits to switch things up for castings and auditions (and I wonder why my purse feels like I’m carrying a bowling ball). So I thought, why not support my own efforts? So, that’s just what I did here — I made my first very own tote which you’ll see complete with my logo and all below. Chic on one side, cool on the other. Wanna see how I did it step-by-step, check it out below!


SUPPLIES: 1 yard of denim, 1 yard of canvas, 1 yard of leather or faux leather, glue, straight pins, scissors, rotary cutter, tape measure, snaps straight edge, iron, and a sewing machine.


HOW-TO:
1. Take your rotary cutter and cut out 6 rectangles — you’ll need all 6 rectangles to be 21 inches x 11 inches each (3 denim, 2 canvas, 1 faux leather. Then you’ll need rectangles for your handles, 2.5 inches x 21 inches — 2 denim and 2 faux leather).
2. Pin down 1/4 seam allowance on both sides of 1 rectangle — this one will serve as the bottom.
3. Iron these down.
4. Pin this bottom to both side panels on either side — I pinned about 2 inches from the bottom of each one.
5. Now sew the 2 side panels to the bottom.
6. Now that you’ve sewn together both side panels and the bottom, take this giant rectangle you’ve created, in half with the right sides facing and pin up both sides.
7. Sew up the left and right sides you just pinned.
8. Now you have a pocket — you’re getting close! Turn it right side out.
9. Pinch the bottom corners together like I’ve shown you here, to box out the bottom of your handbag.
10. Pin the point of your corners you created, to your bag.


HOW-TO CONT’D
11. Your bag is really coming together!  But, now would be a good time to press out those side seams with your iron to make it look really polished.
12. Ok, now for the fun part! Put the bag on your machine and sew these 2 bottom points to the body of the bag.
13. I found these snaps in some of my stuff and didn’t think to put them on before I sewed the points down….so you can either do it the right way, or glue them in place like I did, here.
14. Repeat Steps #1-13 for the canvas and faux leather version, and then place one side inside the other, wrong sides facing.
15. Fold down about a 1/2 in seam allowance on both bags, and pin them into place.
16. Now that your 2 bags are created, it’s time for the handles.  Take 1 denim and 1 faux leather, and place them together right sides facing — pin them together.
17. Sew about an 1/8 in seam allowance on both sides of each handle.
18. It’s going to take some wiggling, but stick a safety pin in the denim and use it as a guide to aid you in turning the handle to the correct side. Repeat for second handle.
19. You want to place the handles between the 2 layers; so peel open the panels, stick the handles in, and pin them in place.
20. With an 1/8 in seam allowance, make 2 stitches around the top perimeter — and you’re all done!


When I took the project to the screen printing store to have the vinyl lettering applied, I was informed that I wouldn’t be able to have the faux leather pressed under their machine, or it would burn. So, I returned with just a piece of canvas and left the denim version as is.  With a little time to think it over, I thought that if I had to redo the bag anyway, I might as well make it as durable as possible, so I picked up some real leather. Not wanting to spend the $200+ on an entire leather skin, I rummaged through a bucket of remnants and found a piece of light tan leather  that would work perfect and was a fraction of the cost  (only $45)– but I wasn’t crazy about its color. So, I purchased it along with some leather spray and got to work.  I lightly applied the spray and distressed the leather a bit with my fingernails — perfect! Tell me what you think ofthe finished look of my reversible bag.