Category: DIY

DIY

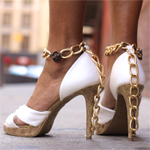
DIY: Chain Link Heels Inspired by DVF

So, I fell in love with these chain link heels from DVF from the moment I saw them.  So I grabbed some secondhand shoes (which I got for $5 instead of $10 because they were missing an ankle strap — which I knew I wouldn’t need, but welcomed the discount) metal chain, closures, and glue and immediately got to work. This takes my heels from drab to fab in no time. Tell me what you think!


SUPPLIES: heels that once had an ankle strap, matches, large chain, smaller chain, 2 leather/metal closures, clear illusion cord, E6000 glue, wire cutters, and pliers.


HOW-TO:
1. Go ahead and measure out how much chain you think you’ll need for your ankle strap (don’t forget to allow room for the metal toggle that will be attached. I used 10 large ones in total), and the chain that will go down the back of the heel (here I used 8) — use your wire cutters to pry the links open, and twist.
2. Remove one link from the smaller chains for the left and one for the right foot.
3. Add this one link to the base of each of the chains that trail down the back of the shoe.
4.Remove the 2 “toggle bars” and “loops” from the leather pieces. Be sure to keep the little rings attached that connect them to the leather, because you will use them in a second.
5. For the ankle strap (again, mine was 10 rings) attach the toggle bar by its ring to the chain (Note: If its for the right shoe, you will do the right side of the chain.  We’ll start with the right foot).
6. Now add the loop via it’s connector ring to the left side of that chain.
7. For the right shoe, you will count in 3 rings from the toggle bar, and then pry open that link.
8. Slide this 3rd link onto the loop on the back of your heel, and close it back.
9. Next take your chain that is 8 links long (the one with the small ring at the base), and attach it to the loop on your shoe as well.
10. Pulling the chain really taught while keeping it straight, slip the clear illusion cord through the small ring at the bottom of the chain that goes down back of shoe. Wrap this cord around heel a couple times right above the shoe tap, and double knot it on the inside of the heel.
11. Cut off excess cord right near the knot you created.
12. Use a match to ever so slightly melt the knot at the base of the heel tap (Note: be really careful doing this or the cord will snap).
13. In the middle of the heel, place just a dab of glue just beneath the chain to hold it in place (Note: you can also add a tiny bit to the chain itself to keep it turned in the direction the desired direction).  I also used a piece of string to tie it in place while the glue dried for about half hour.


DIY

DIY: Camo and Leather Foldover Clutch with Tassel

We’ve seen it on the runways of DKNY and even Valentino — camo is really hot right now!  But you know, I wanted a functional way to wear it — an accent piece that I would get more wear out of then say with a top or a jacket. So, I opted to make a clutch.  I combined the camouflage with a few textural elements like the tassel and leather…and I’m killin’ a bunch of Spring/Summer fashion trends at once.  Tell me what you think. Are you a fan of this neutral pattern?


SUPPLIES: needle and thread, zipper (11.5 inches), rotary cutter, straight pins, faux leather/vinyl, camouflage fabric, silk lining, scissors, wash cloth & iron (optional), and a sewing machine (note: can be hand sewn).


HOW TO:

1. Cut out two camo rectangles (mine were 13 x 10 inches), and two leather rectangles (13 x 3inches).
2. Pin one leather rectangle to camo rectangle. Place raw edges together, right sides facing each other.
3. Flip it over and sew on wrong side. Repeat for other camo/leather section.
4. Cut two pieces of silk out for lining.  (Note: I used my new attached camo/leather rectangle as my guide for what size I would need).
5. Take your zipper face down and pin it to the top edge of the right side of a piece of your camo/leather rectangle AND one piece of the silk (Note: If you happen to find a zipper that is too long, feel free to do what I did here to shorten it).
6. Sew these three pieces together.
7. It may be a little tricky to work around zipper head. You’ll want to sew as close to the teeth as possible, so after sewing about an inch, pull zipper head back. (Note: You’ll move it back into position as you go along).
8. Right sides facing, take the other camo/leather piece and silk and lay it on top of the other side.  Pin the free side of the zipper to these pieces along the raw edge.
9. Sew the zipper on.
10. Be sure to watch out for the zipper pull like in Step #7.
11. It’s time to sew it all together! Use straight pins to give yourself about a half inch seam allowance on the remaining three sides.
12. Go ahead and sew it all up.
13. Before you get to that last side….be sure to open up zipper a few inches so you can get it open once you are done sewing.
14. Cut corners of bag off at an angle on both sides.
15. Flip bag to the right side.
16. Take a piece of leather about 7.5 inches in length, and cut about 7 thin strips of leather for your tassel with the rotary cutter.
17. Fit leather strips through zipper head.
18. Take one leather strip and wrap it firmly around the head of the bundle of strips three times.
19. Hand stitch this binding strip to the bundle of strips for security.  Cut off excess.
20. If your fabric is puckering at all, feel free to iron it out, applying a damp cloth over the leather portion.


DIY

DIY: Chevron and Ikat Throw Pillows

Okeedoke, so I am going to let you in on a little secret of mine.  I’m the kinda girl that always experiments/injects loads of color into my wardrobe…but I must admit I’m a bit of a commitment phobe when it comes to adding splashes of color to my living space.  While out shopping for my  latest DIY, I thought throw pillows would be the answer — they’d be the perfect solution to ramp up the color factor in a way that’s changeable with the seasons.  I’ve never done these before but I gotta say, I think they turned out pretty darn good, and even have some professional finishes.  Let me know what you think in the comments below, or if you plan on trying them to give your space a little color.


Chevron and Ikat Throw Pillows 2 Chevron and Ikat Throw Pillows 3
SUPPLIES: fabric, straight pins, invisible zippers, needle and thread, rotary cutter, chalk, measuring tape, scissors, and a sewing machine.
Chevron and Ikat Throw Pillows 4
HOW-TO:
1. Cut out front and back forms.  I have 18×18 inch pillows (Note: if you’d like them nice and snug, cut them exactly 18×18 inch, but if you’d like a little room in yours like I have here, cut them 19×19 — the extra inch is for a half inch seam allowance on each side).
2. I wanted to illustrate how to cut the form if you want to use a fabric with a design that needs centering. So here I used my ikat pillow.  To center it, place a straight pin at the design’s mid point, then measure 9.5 inches to the left, and then to the right of that center point.
3. If you happen to get a zipper that’s a bit too long…no fear, I just learned a trick to shorten them.  The ones I purchased were about 25 inches, but I wanted them shorter than my pillows.  So, starting at bottom of zipper, I stuck a straight pin at 16 inches — my new desired length.
4. Next take a needle and thread and stitch around the teeth of the zipper at the 16 inch mark.
5. Once you’ve knotted the thread around the teeth, cut the remainder of the zipper about a half inch beyond this new point.
6. Then you’ll snip the fabric on either side of the zippers teeth up to the thread.
7. Hold the side flaps back and remove the excess teeth.
8. This is how is will look on both ends when you are finished.
9. Take one side of your pillow forms, facing right side up (doesn’t matter which side).  Next use your straight pins to attach face down zipper against the top raw edge. (Note: I placed pins on both side of the zipper because it tended to move around a bit).
10. Using a zipper foot, I sewed the zipper onto the fabric, with the foot getting as close to the zipper’s teeth as I could.
11. Sew right up to the head of the zipper.
12. Lift zipper foot, pull back the zipper’s head and continue to stitch, and then back stitch to fully secure the zipper to the fabric — avoiding any weird bulges in places that might have been missed had you not maneuvered the zipper head.
13. Once this is complete, take the second side of the pillow form and place right sides together.  Secure the other side of the zipper to the very top of this form with straight pins.
14. Sew the zipper on in the same way you did for the previous side.
15. You are now ready to close the pillow up. I pinned it on all sides to keep it straight. (Note: Be sure to start and end on either side of the zipper.  If you want a finished look, create a little pocket for the zipper by sewing slightly below the zipper before continuing down the pillow form sides).
16. Sew down sides.
17. Before you make this last turn right below the zipper on the opposite side, be sure to leave the zipper open a few inches (even more than I did here) so you can open it once you’ve sewn it all shut).  It will be tricky to open if you don’t.
18. Snip the bottom corners of the pillow form.
19. Flip the pillow form to the right side, and you are all set!
Chevron and Ikat Throw Pillows 5 Chevron and Ikat Throw Pillows 6