Category: DIY

DIY

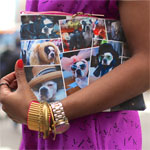
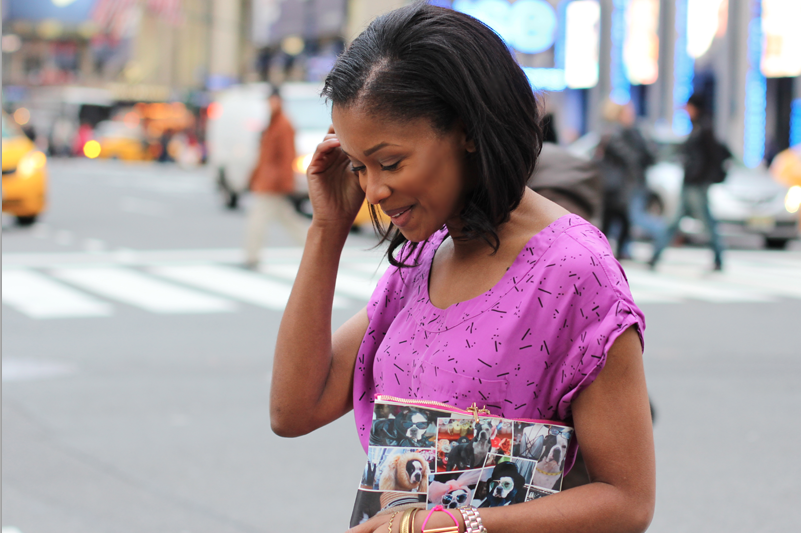
DIY: Double Zip Printed Clutch

I’m not sure how many dog lovers we have out there, but one of my favorite pooches to see all dressed up is Swatch of Mood Fabrics. His nonchalant and carefree trot between departments always makes me grin when I’m there. A true sport in a land of endless wardrobe possibilities, Swatch made me want to commemorate some of my favorite looks he’s rocked (and you can do it with any photos of your loved ones). From a funny Valentine to biker Swatch, I’m sure I’m not alone in saying that that dog has captured the hearts of SO MANY Mood customers.  So with some colorful vinyl and snazzy zippers in hand, I created a way to carry him around with me — without further ado, here’s my homage to Swatch 🙂

Double Zip Printed Clutch 2 Double Zip Printed Clutch 3
SUPPLIES: vinyl, rotary cutter, mod podge gloss lustre, magna-tac glue, iron, measuring tape, thread, needles, straight pins, scissors, pen, transfer paper for dark shirts, zippers, silk, images you want to transfer, and a wash cloth.
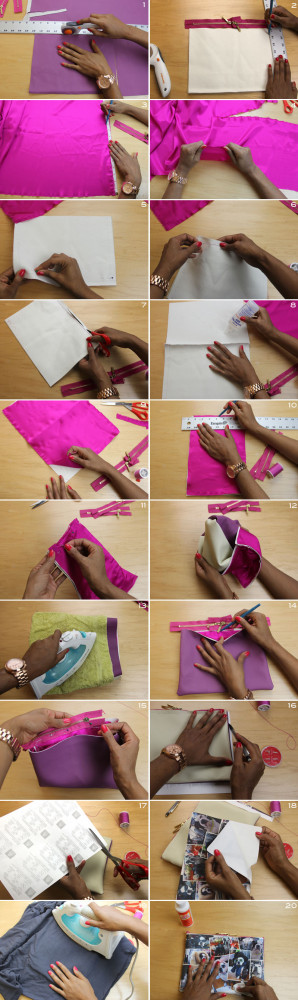
Double Zipper Printed Clutch How-To

How-To:
1. Using the rotary cutter, cut out 2 rectangles from your vinyl/faux leather.  (Note: Mine were 11 x 8 inches — 1 inch was added to the length of the teeth of the zipper, and height too.  I used purple on the backside and off-white on side where my images would go).
2. Mark out a half inch seam allowance  (Note: You will re-mark this when silk is applied).
3. For silk lining, I marked out a 10 x 8 inch rectangle.
4. For less fraying, make a small snip with scissors to begin with, and then I hand rip out the rectangle.
5. Putting right sides together, add straight pins to hold vinyl together.
6. Across the bottom, hand stitch along one horizontal. (Note: For neatness, sew along the half inch seam allowance line you marked out — be sure to bring needle back through, last place you inserted it).
7. Cut off excess.
8. Apply Magna-tac glue to the whole back side.
9. Lay silk directly on top of the glued side.
10. Re-mark out half inch seam allowance along sides.
11. Add straight pins to hold sides together.
12. Flip whole thing onto correct side.
13. Apply damp cloth over clutch, and then iron it to flatten it out.
14. For a center point for the double zippers, mark a mid point on the inside of the clutch.
15. Add straight pins to hold zipper in place, and then hand stitch both into position.
16. Lay clutch on top of back side of iron-on transfer with images already printed on it and outline it. (Note: For printing, follow instructions that come with the paper).
17. Cut form out.
18. Peel off images from transfer paper backing, and lay it on to the clutch.
19. Laying something like a t-shirt on top, iron on the transfer paper images.
20. Using a napkin/sponge, apply Mod-Podge to seal it.

Double Zip Printed Clutch 4

DIY

DIY: Ostrich Feather Skirt

So…I picked up a copy of Instyle Magazine this month (for leisurely reading AND because I happen to be in this issue –insert squeals of delight — and I noticed that since Spring is right around the corner they predicted that a hot color this upcoming season would be pistachio.  I don’t know about you….but it’s sometimes hard to keep up with every NEW color of every season.  Well, that is unless you get a little box of dye and do what I did — give a whole new life to an item I already had.  I’ve been itching to make an ostrich feather skirt…and I thought this would be a perfect combo — flirty, fun, and fresh.


SUPPLIES: An old skirt, 1.5 inch wide ribbon, at least 8 yards of ostrich feather trim (Note: the amount of feathers you’ll need depends upon desired size and length of skirt. I used about 7 yards here for 2 layers on each of the 4 rows), 1 box of RIT dye, hair dryer, thread, straight pins, needles, Magna-Tac glue, scissors, gloves, and a pot (Note: your sink or a bucket will work too).


HOW-TO:
1. Follow directions on box to create dye mixture.  Dip whole lot of trim into the dye at all at once for even distribution of color (I advise wearing gloves).
2. Making sure to evenly coat feathers, remove them from solution after no more than 25 seconds (Note: though they turn pretty quickly, feathers appear darker when wet).
3. Rinse feathers in cold water to remove excess dye.
4. Dry feathers.
5. You can either make a skirt from fabric of a similar color, or you can do what I did and use a light colored thrifted skirt I already had. Dip this skirt in dye.
6. Rinse skirt in cold water to remove excess color, then repeat Step 4 for the skirt too (Note: sticking in dryer is quicker).
7. Eyeball where you’ll place each row before you begin — I made 4 main rows in all. Apply glue to trim, and adhere it 1.5 inches above the bottom of the skirt — each row 2 inches a part. Glue from one side seam to the other (Note: If towards top you’re finding that the rows aren’t as full as you’d like, feel free to glue a sub-row in between 2 main rows for added coverage).
8. Pin row in place and then continue it around the back.  Do this one more time around the whole skirt for a 2 total of 2 evolutions. (Note: for a really full skirt, do 3 layers).
9. My skirt had an invisible side zipper, so I glued back the raw edge that would lie right up against the zipper (sort of like a small hem). Here, instead of making a continuos counter clockwise evolution….I started at zipper, went counter clock wise, and when I reached zipper again, I went back clockwise up to zipper.
10. For added security hand stitch each row onto the skirt as you go.
11. Glue raw edge of ribbon down like you did with feather trim edge in Step 9.
12. For a polished look, glue ribbon around the waist band of skirt to conceal top of exposed feather trim.


:: Outfit ::
Blazer :: United Colors of Benetton
Sweater :: Banana Republic (Thrifted)
Skirt :: My Own Creation
Necklace :: Stella & Dot (Thanks Paige)
Watch :: Michael Kors
Rings :: Aldo
Shoes :: Rachel Roy

DIY

DIY: Leather Envelope Laptop Case


SUPPLIES: Leather, Fleece, Fabric Glue, Velcro, Heavy Duty Thread, Regular Thread, Upholstery Needle, Tape Measure, Needle, Rotary Cutter, Straight Pins, Wash Cloth, Scissors, Iron, and a Sewing Machine.


HOW-TO:
1. You are going to create two rectangles.  For the first, pin a piece of leather and felt together, right sides facing each other. My Macbook Pro laptop is 13 in x 9 in (length x height), so I want to make this first rectangle 14 in x 17.5 in (Note: I added an inch to the length for the seam allowance, and then added 8.5 in to the height to account for the flap).
2. Cut it out.
3. Take the first rectangle which is 14 in x 17.5 in, and make a chalk mark 10.5 in from the bottom for the fold line.
4. Make a second mark one inch above the fold line (So it’s 11.5 in from the bottom).
5. To create my top flap, I made a chalk mark in the top center (For me, directly at 7 in).
6. I want the point of my flap to be 9 in in total, so I made a chalk mark 4.5 in on either side of the center line I created.
7. From the 11.5 in mark you made along the side, draw a diagonal up to the 4.5 in marks you made on the left and right side of the center mark.
8. Sew just around the edge of the top flap and about a half inch down the straight away of the sides.
9. Here’s what Step 8 looks like; now remove pins.
10. Turn this flap to the correct side.
11. Measure the desired length of the velcro, add glue, and adhere it to the inner flap.(Note: I add glue to hold it in place, and then later hand stitch it for added security, or sew it on with the machine with the regular thread).
12. Now you grab two more pieces of leather and felt, rights sides facing each other to create a second rectangle –this one will be 14 in x 10.5 in and will serve as the front of your laptop case.
13. Take this second rectangle and sew along the diagonal on one side as pictured (Note: Right sides are still facing together).
14. Step 13 will look like this.
15. Turn this second rectangle on the right side.
16. Take a damp wash cloth and lay it on both pieces to iron out any bulges.
17. Take the second rectangle and pin it to the front of the first rectangle (well…now, it’s more of a trapezoid); right sides together. Be sure to pin it 1/4 in below 11.5 in mark you made (So that’s in between fold line and this second line).
18. Sew the whole thing together on both sides and the bottom.
19. So you are certain you place bottom piece of velcro in just the right place; insert your laptop, stick bottom velcro onto top velcro every so lightly, apply glue, and press it into place. Let dry for a few minutes before removing laptop. Feel free to stitch it for added security.


:: Outfit ::
Jacket :: Zara
Tshirt :: No label (Thrifted)
Denim Chambray :: Uniqlo (Thrifted)
Jeans :: Banana Republic (Thrifted)
Envelope Laptop Case :: My creation
Rings :: Aldo
Shoes :: Steve Madden