Category: DIY

DIY

DIY: Beyonce Super Bowl Inspired Bustier

Was I the only one who sat in awe after the Super Bowl half time show back in February?  Not only at Beyonce’s performance  — I mean Kelly and Michelle were a refreshing throwback — but of Beyonce’s COSTUME?  I literally said out loud when she flashed that winning smile at the end….”now THAT’S HOT!” Entralled with the look, I found the guipure lace, got my hands on a secondhand leather vest, and got to work.


Beyonce Inspired Bustier 2
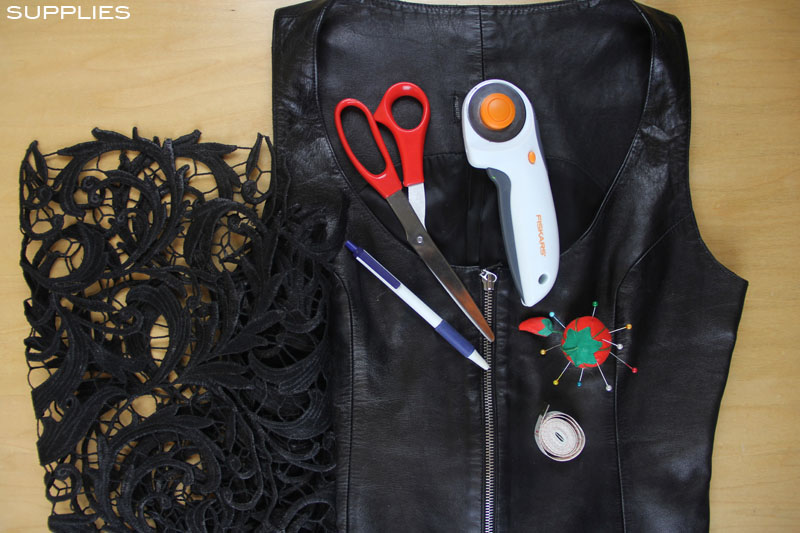
Supplies: Leather vest, guipure lace, rotary cutter, scissors, straight pins, tape measure, straight edge, pen, sewing machine, and/or  needle and thread.  (Note: you can use fabric paint or spray paint to dye lace if you’d like).
Beyonce Inspired Bustier 3
How-To:
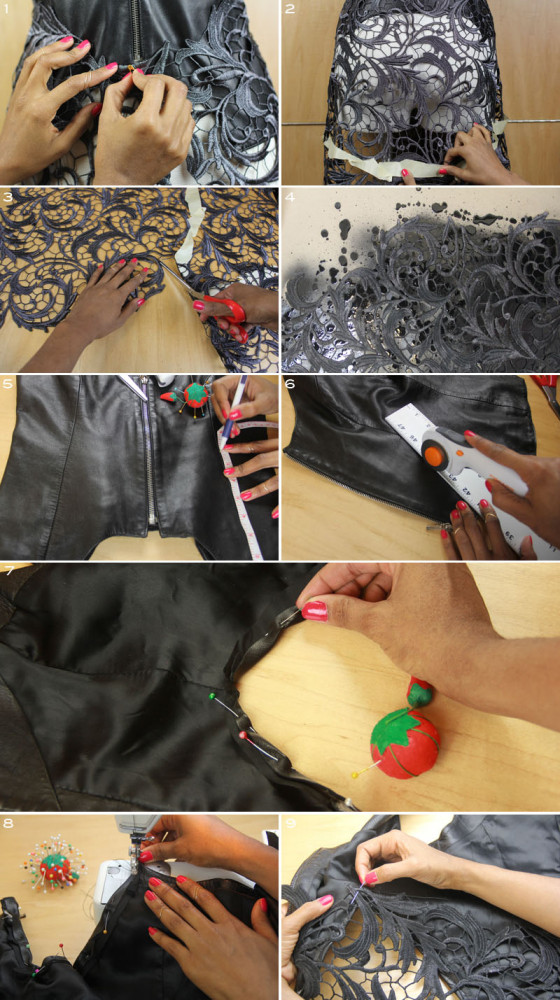
1. Wrap lace around your body, or mannequin to estimate where lace will fall and how much you’ll need.
2. I used masking tape here, but it would be just as easy to use straight pics to section off a guide to what part of the design you want to include BEFORE you cut.
3. Cut out the “U” shaped form of lace you’ll be working with — slowly snipping pieces of the lace close to the edge that won’t be included in your design.
4. I wanted a slightly darker shade than what was available, but this step is totally optional.  To change lace color, feel free to use fabric paint or even spray paint to do the job.  (Note: I tried RIT dye initially, but unfortunately it didn’t work).
5. Use tape measure and pen to mark out the deep “V’s” of leather that you’ll remove from the abdomen area of the vest.
6. Use a rotary cutter to precisely cut the leather.
7. With straight pins, hem the rough edges of the vest that are left after you cut out the V’s.
8. With a half inch seam allowance, hem the leather V’s.
9. Hand stitch lace onto the inner lining of the vest.

Beyonce Inspired Bustier 4

DIY

DIY: Gold Ring Necklace

We saw hints of the gold hardware during the Spring Fashion Week, and it really packed a punch during the Fall Shows….so of course I had to grab some chain from Mood Fabrics and make a little something of my own. Whether you use remnants from an old tshirt or synthetic leather cord like I did here….this necklace may be easy to construct, but speaks volumes in the bling department!


SUPPLIES: 
gold ring chain from Mood, and synthetic leather cord.

HOW-TO:
1. With the two layers, maneuver chain around to decide how you want your necklace to drape.
2. Pry open the ring.
3. Remove excess rings, and reattach it to the main part of your necklace (so, now you have a complete circle).
4. Take your first piece of cord and fold it in half.  Place the loop that is now formed at the bottom, through your gold ring that is your anchor point.
5. Slip loose ends of cord through the loop and pull tight. Repeat of opposite side.


DIY

DIY: Metal Embellished Skirt

Now I haven’t been to many sample sales…but I recently checked out the Oscar de la Renta sale, and stumbled upon a beautifully embellished skirt — I mean metal embellishments have been everywhere lately, including the runways of this past New York Fashion Week. Inspired, I grabbed a skirt I had made from an old turtleneck (seen here), and some sparkly ornate trim I had been eyeing, and I married the two. It’s easy. It’s fun…and it takes any skirt from drab to fab!


Supplies: Skirt, embellished trim, coins, scissors, thread, needles, and chalk.
How-To:
1. Take nickel (any uniform coins) and mark out your desired layout.
2. Removing each coin along the way, mark out where each embellishment will be sewn.
3. With one long and continuous thread, first hand stitch center crystal into place.
4. Then sew in place middle row of embellishments (Note: the two silver pieces are separate pieces).
5. Next sew into place third row of embellishments below the crystal.
6. Then sew into place bottom/lower middle embellishment.
7. Now sew into place the very top row of the embellishments (Note: by doing this one last, you are able to control the height of each cluster, for perfect alignment against other groupings).
8. Working counter clockwise, sew in between each silver piece, the thin gold embellishments. On the last one triple knot the thread on the inside of the skirt.