Category: DIY

DIY

DIY: Studded Denim Jacket with Leather Sleeves

Happy mid-week everyone. I’m really excited about this latest DIY — one night while watching an episode of DON’T TRUST THE B— IN APT. 23 I fell in love with a studded collar black denim jacket Krysten Ritter was wearing. Totally inspired, I took to my closet to scrounge up this thrifted Armani Jeans jacket that I hadn’t even worn; however, I wanted to take it a step further.  Yes I’d do studs (galore), but I’d also take this amazing perforated leather that I found…and give my jacket the ultimate touch of “cool.”
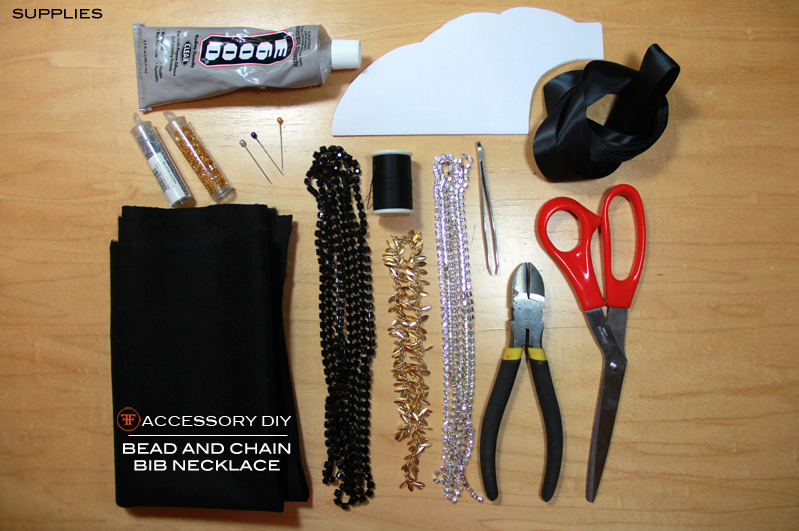


SUPPLIES
Heavy Duty Thread, Seam Ripper, Denim Needles, Straight Pins, Denim Jacket (I got this one for .75 cents), Thimble, Tweezers, Scissors, Studs (I opted to mix my metals and use both silver and gold), Leather, and a Sewing Machine


HOW-TO

1.Take each lapel followed by the collar of the jacket and insert each nailhead with a thimble in your desired pattern. Remember to separate the layers with your fingers, so as to not have prongs from nailheads protrude to the underside.  (Note: I recommend laying them out to begin with to get a visual sense of how many you will need spatially in each row).
2. Cut the denim sleeves from the jacket (Note: Take my advice and measure twice, cut once). You should leave yourself about an inch allowance. Measure it on both the front and back.
3. After you’ve removed the sleeves, take one sleeve along with a seam ripper and take apart the two pieces (I didn’t bother to remove the cuff). This way you can use the two “halves” as a pattern for the two leather sleeves you are now creating.


4. Double up two large portions of the leather. Lay out the two pieces of the sleeve you just took apart, and use the straight pins to secure them to the two pieces of leather.
5. Cut out these 4 forms, giving yourself a couple extra inches for allowance at what will become the shoulders, and then remove the straight pins.


6. Now that you have two pieces from each layer of leather, take the first layer and begin pinning the sleeves together inside out at the seams, just like the denim sleeve you just removed.
7. Now pin the second seam of the sleeve to close it up.
8. Sew both seams on each sleeve.
9. Turn the completed sleeves on the correct side.
10. Make sure the jacket is inside out, and slip the sleeve into the arm hole on the correct side (Note: You’ll know you did it correctly when both finished sides of the sleeve and jacket are touching).
11. I didn’t take my own advice and measure twice before removing denim sleeves.  But if you left yourself that inch, you should be able to pin the leather sleeve to the jacket and recreate the same seam as before.
12. Sew the leather arm onto the jacket (Note: Start and finish sewing at the under arm — this way any excess can be concealed here if necessary).

DIY

DIY: Bead and Chain Bib Necklace

Over the holidays while browsing the lovely pieces on the Stella & Dot website, I happened to fall in love with one of their absolutely stunning mixed metal bib necklaces, but lost a little steam when I peeped the price tag. Not one to let finances dictate fashion…I took to Mood Fabrics for my jewelry supplies, and let the creativity fly to create my own.

Supplies:
Multi-purpose glue, bib template (download here), satin ribbon, tiny individual glass and plastic beads, straight pins, needle and thread, tweezers, felt, black rhinestone chain, loose leaf chains (purchased from another store), clear rhinestone chain, wire cutters, and scissors (Note: I also at the last minute added a bit of gold chain around the neckline for an extra special touch).

Step-by-Step:

1.Download bib template here.
2. Fold a piece of felt or ultra suede in half, and then pin the template to these two layers.
3. Cut out these two forms, and then remove straight pins.
4. Choose one layer of the cut out felt; set the other layer aside.


5. With wire cutters, remove leaves from their chain.
6. Cut rhinestones and beaded chains to desired length (Note: I suggest playing around with beads to get an idea of layout before doing any gluing and sewing).


7.Add a tiny bit of glue to back of chain to adhere it to the felt, following up with stitching where necessary for added stability.
8. Glue beaded black rhinestone chain within the body of the necklace; cutting where necessary to wedge into tight spots for a seamless appearance.
9. Apply a tiny amount of glue to fix leaves in place. Let leaves dry for at least 20 minutes before stitching them into place, and then repeat.


10. Take a needle and feed a single thread through top necklace layer, knot the back, thread tiny plastic beads onto the string, and then remove needle for ease of applying beads.
11. Once you reach your desired amount of beads, add needle back to thread and use it to drive this string back through this layer, and knot the back (Note: I also added a tiny bit of glue to the under side of the finished row of beads just so they wouldn’t move).

12. Cut 2 pieces of ribbon to your desired length (Note: You can cut one side straight across, and then cut the exposed side at an angle for added effect).
13. Apply glue (or clear nail polish) to ends of ribbon to avoid fraying.
14. Turn top layer of necklace over and glue each ribbon about 1.5 inches from top of each side. (Note: Feel free to also stitch ribbon to necklace).
15. Take 2nd layer of felt that you set aside in Step #4 and glue it to the back of 1st layer.


Enjoy!

Tell me below….do you have a favorite Stella & Dot piece you’d like to recreate?
 

DIY

DIY: Feather Collar Necklace

Plumes just make everything glamourous — don’t you think?!  From Flappers to the present day, we have been using feathers for ages to dress up everything from hats to handbags to skirts.  Want an easy way to update the simplest dress? Try this twist on a Statement Necklace that is sure to be a conversation piece.

WHAT YOU NEED:
1. Hot Glue Gun & Sticks
2. Feather Trim (purchased at Mood ) (Please note: the exact length of trim needed is directly related to desired length to drape your shoulders.)
3.  4 Different Types of Chain at varying lengths (1 main chain for collar, and 3 other chains that will be cut and used twice each).
4. Needle and Thread
5. 3 Gold Rings
6. Clasp
7. If desired, add 2 gold brooches for accents (I added old earrings that were my grandmothers)

THE PROCESS:
1. First cut feather trim at main gold chain to equal desired length (mine is 18inches).
2. Hot glue this main chain to the satin ribbon on feather trim.
3. Turn feather with gold chain now attached over, and stitch your clasp to one side (doesn’t matter which, all depends which side you want clasp on).
4. Cut first chain to create Chain 1 (31 inches) and Chain 4 (17 inches); Cut  second chain to create Chain 2 (25 inches) and Chain 5 (13 inches); and then cut third and thinnest weight chain to create Chain 3 (20 inches) and Chain 6 (7.5 inches)
5.  Add chains IN ORDER from 1 to 6 to gold rings on both ends.
6. Sew and hot glue one ring (with chains attached) to whichever side you did not attach clasp.
7. Open clasp and close necklace with this free ring that has chains now attached.  One more step and you’re almost done.
8. Hot glue earrings, 2 brooch, or whatever accents you’d like to add to the base of the feathers for a polished look.
Voila!

Now tell me what you’ve been rocking with feathers in your closet?