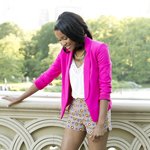
Author: frugal-nomics

OUTFITS

Pink Overload

Happy Wednesday guys!  You know….I’m noticing that besides black, pink and yellow are the two dominant colors in my wardrobe.  I guess you can say I follow my own advice, “if you get compliments in it, stock up on it.” 🙂  I had been on the hunt for a fuchsia blazer, and this one has become one of those fast favorites in my closet that I have to pick the special times I wear it — otherwise I’d live in it. LOL!  Not one to pass up on a deal, when I bought it originally it wasn’t on sale, but soon went on to be 40% off 2 weeks later.  So…after calling to confirm, I went back up to the store with receipt in hand, and got the price adjustment of $57 returned. Lesson: It never hurts to try…and boy was I glad that I did.

:: OUTFIT ::

Blazer :: Express
Tank :: (thrifted)
Shorts :: Rachel Roy
Necklace :: (2nd hand from eBay)
Shoes :: Rachel Roy

Photos by :: LaRie Taylor

DIY

Frugal-nomics DIY: Fabric Covered Lampshade

I’m finding that creating your own personalized home decor has never been easier.  So I decided to finally do something with the blank lampshade I’ve been staring at for a couple years now.  I knew I wanted something with a splash of yellow that would compliment the throw pillows I had made a while back.  So, with less than an hour of time and a yard of fabric, I created a splashy solution that completely brightens up my space.  Tell me what you think?


SUPPLIES:  lampshade, a yard of light- to medium-weight fabric, scissors, fabric glue, pencil, and spray adhesive.

1. Wrap your lampshade in your fabric, then take your pencil and mark 1.5 inches past the point where the fabric meets the other side.
2. Being conscious of where you want your pattern to lay on the shade, mark 1 inch with your pencil at what will be the top and bottom of the lampshade drum.
3. Cut out your form — it will look like this.
4. Lay out some newspaper, and spray your lampshade with the adhesive (Note: It’s best to do this outdoors; but if you must do it indoors, be sure to be in a well ventilated area).
5. In addition to the shade, spray your fabric with the adhesive, along with dotting it with the fabric glue for added security (Note: I added the fabric glue because I realized my spray adhesive was only temporary).
6. Carefully wrap your lampshade in the fabric — I started in on the seam, so I could end there as well (Note: It was immediately fast drying, so I had a few seconds to play around with it to get it right).
7. Glue along this seam that you started and stopped on, then fold back the flap so you have a neat edge — now press it into place.
8. I wanted my print to line up as best it could….here it how it looked along the seam.
9. Lastly, glue along the top and bottom edge of the drum, and then fold the fabric down, like a hem (Note: If you want it to look really neat, fold it down twice — feel free to use the iron if you need to). Voila!

OUTFITS

Cargo Diem

Happy Friday guys!!!  So while it’s technically fall, we are squeezing out our last handful of warm days, and I couldn’t resist showing you a few pieces I’ve picked up and customized over these last few months.  I’ve been wanting a cargo vest since last year — that’s why I always say to invest in a few wardrobe pieces and you’ll get wear out of them year after year — so since I had a couple thrifted cargo jackets, I took one to my tailor and had the sleeves removed to achieve the look I wanted.  To top off the look, I also took to creating my own version of a necklace I’ve been drooling over — the Pegasus Necklace by Stella & Dot.  But, I didn’t want to fork over the $200 plus price tag….so…after a little digging, I found some leaf chain and took to my latest #diy.  Like the look….tell me what you think below. Have a beautiful weekend!

:: OUTFIT ::

Cargo Vest :: H&M (originally a thrifted jacket that I had turned into a vest)
Tank :: Faded Glory
Shorts :: Zara (2nd hand from eBay)
Necklace :: (My own creation)
Boots :: Steve Madden
Bag :: Kenneth Cole