Tag: gold jewelry

DIY

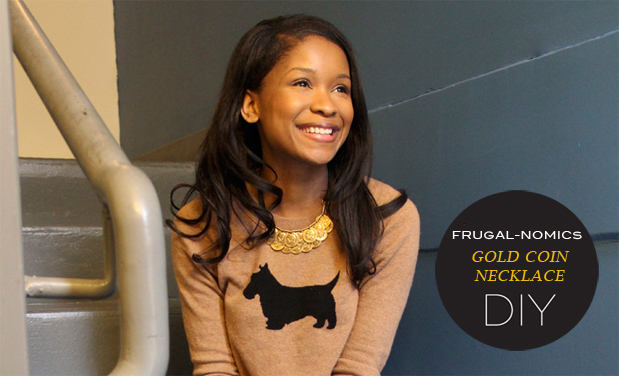
Frugal-nomics DIY: Gold Coins Necklace

A while back I came across a necklace called Loose Change made by Anthropologie — I was immediately taken by the piece’s simple construction and high potential for versatility. While their coins were textured, they were plain and I wanted my coin pendants to have a little more character. So, when I  came across these gold coins at Mood I knew I’d found just the foundation I needed to complete it. A few supplies, and a little suede cord and I was well on my way. Tell me what you think below.

SUPPLIES: some gold wire, a pair of scissors, (2) 1/4 in findings, pliers (2 pairs, help), wire cutters, 15 gold coin pendants, suede cord,
a few cocktail straws, packet of tiny findings, can a spray paint, and some newspaper for easy cleanup.

HOW-TO:
1. Ok, first you’ll take both sets of pliers and open up the tiny findings that will attach each of the 15 coins.
2. With your wire cutters, snip your cocktail straws into 1/2 inch pieces — I cut about 17.
3. Cut 2 pieces wire — one slightly longer than the other (about 1.5 inches).
4. Now attach the findings to the coins, and then close them back with your pliers.
5. I cut another long piece of wire and slipped all my pieces of straw onto it, and then sprayed them with gold spray paint.
(Note: I suggest letting them dry overnight).
6. Take your 2, 1/4 in findings and slip knot your 2 pieces of suede cord through them both.
7. Alternate gold coins and straw pieces on your 2 pieces of wire — 7 coins on shorter wire, and 8 on the longer.
8. With your needle nose pliers, bend the ends of the wire onto the findings.

DIY

Frugal-nomics DIY: Stella and Dot Inspired Pegasus Necklace

I’ve gotta admit that I’ve had a jewelry crush on the Stella and Dot Pegasus Necklace for a couple years now, and while I believe in investing in a few really nice statement necklaces, I couldn’t bring myself to cough up the over $200 price tag they were asking. So, me not minding to put the work in when it’s something I want, I took to finding suitable leaves to begin my jewelry quest to create a Stella and Dot Pegasus Knockoff. I was so very excited to complete it, and I’m happy to say that I get soooo many compliments on this when I wear it — and I do wear it quite often.  Gotta a necklace you’re crushing on? Tell me below. Of if you’ve been inspired by this one….please leave a comment too.


SUPPLIES: felt, patina, glue, assorted chain (I used 2 kinds), bulk folded leaf chain (I used about 6 feet — about 120 leaves come on each foot), 3 findings, a lobster clasp, tweezers, scissors, pliers, wire cutters, straight pins, a bowl, and paper to create the pattern for the shape of the necklace you desire.


HOW-TO:
1.  Take a piece of paper and fold it in half, then cut out the shape of your desired necklace. After that…use your straight pins to attach your paper pattern to your folded in half felt.
2. Cut out this form.
3. The leaves will come on a chain, so take your wire cutters and remove them all from the chain.
4. Once all the leaves were removed from the chain, here I used my tweezers to lightly dip each leaf in the glue and then carefully adhere it to the wrong side of the felt.
5. I made long rows from left to right, being careful to visualize where my rows of leaves with patina and chain would begin.
6. Next I immersed about 155 leaves in a small bowl with green patina, and let it sit for a few hours. Once they reach my desired color of green, I rinsed them off, and then patted them dry before glued them to the felt.
7. Figure out how low you want your necklace to hang — mine is moderately close to my neck, then cut the 2 types of chain to your desired length.
8. Add a little glue to the exposed surface of felt, and press your chain into place.
9. Add a jump ring and clasp to one dangling side of your chain, and then pinch it closed. Repeat on opposite side with just a jump ring.


DIY

Frugal-nomics DIY: Cord and Chain Bracelet

This summer I’ve been making more jewelry to mix and match with different looks.  And I gotta say, nothing beats the pride in saying you made it yourself when others tell you they like it.  Definitely more pieces to come. Tell me what you’re proud that you made in the comments below.


SUPPLIES: Metal chain, colorful cord, 2 pair of pliers, a tape measure, wire cutters, 3 jump rings, lobster clasp, 2 end caps, e6000, and scissors.


HOW-TO:
1. First you have to decide what length you want your bracelet.  I want mine to be about 7 inches in total, so the cord part of the bracelet will be about 4 inches (both halves 2 inches each). Go ahead and cut the first piece.
2. Cut a second piece equal in length.
3. Squeeze half a cap full of glue into the end cap (be careful not too add too much, you don’t want it to ooze out onto the cord).
4. Fold the first piece of cord in half and squeeze both ends into the end cap.
5. Slip the second piece of cord through the loop of the first cord.
6. Now, repeat Step #3 with the second cord.
7. To complete my 7 inches, I’ll need about 2.5-3 inches of chain.
8.With wire cutters, cut the desired length of chain.
9. With both pair of pliers, carefully open up 3 jump rings.
10. Take one jump ring and place it on one end of your cord connection, then attach your chain and close the jump ring.
11. At the end of this chain, add one more jump ring and a lobster clasp, and then close that jump ring.
12. On the opposite end of the cord connection, add a final jump ring, close that one up….and you’re all set.