 DIY
DIY
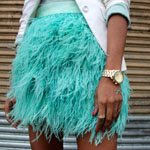
DIY: Ostrich Feather Skirt
So…I picked up a copy of Instyle Magazine this month (for leisurely reading AND because I happen to be in this issue –insert squeals of delight — and I noticed that since Spring is right around the corner they predicted that a hot color this upcoming season would be pistachio. I don’t know about you….but it’s sometimes hard to keep up with every NEW color of every season. Well, that is unless you get a little box of dye and do what I did — give a whole new life to an item I already had. I’ve been itching to make an ostrich feather skirt…and I thought this would be a perfect combo — flirty, fun, and fresh.


SUPPLIES: An old skirt, 1.5 inch wide ribbon, at least 8 yards of ostrich feather trim (Note: the amount of feathers you’ll need depends upon desired size and length of skirt. I used about 7 yards here for 2 layers on each of the 4 rows), 1 box of RIT dye, hair dryer, thread, straight pins, needles, Magna-Tac glue, scissors, gloves, and a pot (Note: your sink or a bucket will work too).

HOW-TO:
1. Follow directions on box to create dye mixture. Dip whole lot of trim into the dye at all at once for even distribution of color (I advise wearing gloves).
2. Making sure to evenly coat feathers, remove them from solution after no more than 25 seconds (Note: though they turn pretty quickly, feathers appear darker when wet).
3. Rinse feathers in cold water to remove excess dye.
4. Dry feathers.
5. You can either make a skirt from fabric of a similar color, or you can do what I did and use a light colored thrifted skirt I already had. Dip this skirt in dye.
6. Rinse skirt in cold water to remove excess color, then repeat Step 4 for the skirt too (Note: sticking in dryer is quicker).
7. Eyeball where you’ll place each row before you begin — I made 4 main rows in all. Apply glue to trim, and adhere it 1.5 inches above the bottom of the skirt — each row 2 inches a part. Glue from one side seam to the other (Note: If towards top you’re finding that the rows aren’t as full as you’d like, feel free to glue a sub-row in between 2 main rows for added coverage).
8. Pin row in place and then continue it around the back. Do this one more time around the whole skirt for a 2 total of 2 evolutions. (Note: for a really full skirt, do 3 layers).
9. My skirt had an invisible side zipper, so I glued back the raw edge that would lie right up against the zipper (sort of like a small hem). Here, instead of making a continuos counter clockwise evolution….I started at zipper, went counter clock wise, and when I reached zipper again, I went back clockwise up to zipper.
10. For added security hand stitch each row onto the skirt as you go.
11. Glue raw edge of ribbon down like you did with feather trim edge in Step 9.
12. For a polished look, glue ribbon around the waist band of skirt to conceal top of exposed feather trim.

:: Outfit ::
Blazer :: United Colors of Benetton
Sweater :: Banana Republic (Thrifted)
Skirt :: My Own Creation
Necklace :: Stella & Dot (Thanks Paige)
Watch :: Michael Kors
Rings :: Aldo
Shoes :: Rachel Roy