 DIY
DIY
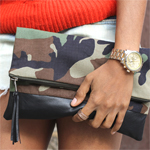
DIY: Camo and Leather Foldover Clutch with Tassel
We’ve seen it on the runways of DKNY and even Valentino — camo is really hot right now! But you know, I wanted a functional way to wear it — an accent piece that I would get more wear out of then say with a top or a jacket. So, I opted to make a clutch. I combined the camouflage with a few textural elements like the tassel and leather…and I’m killin’ a bunch of Spring/Summer fashion trends at once. Tell me what you think. Are you a fan of this neutral pattern?

”


SUPPLIES: needle and thread, zipper (11.5 inches), rotary cutter, straight pins, faux leather/vinyl, camouflage fabric, silk lining, scissors, wash cloth & iron (optional), and a sewing machine (note: can be hand sewn).

HOW TO:
1. Cut out two camo rectangles (mine were 13 x 10 inches), and two leather rectangles (13 x 3inches).
2. Pin one leather rectangle to camo rectangle. Place raw edges together, right sides facing each other.
3. Flip it over and sew on wrong side. Repeat for other camo/leather section.
4. Cut two pieces of silk out for lining. (Note: I used my new attached camo/leather rectangle as my guide for what size I would need).
5. Take your zipper face down and pin it to the top edge of the right side of a piece of your camo/leather rectangle AND one piece of the silk (Note: If you happen to find a zipper that is too long, feel free to do what I did here to shorten it).
6. Sew these three pieces together.
7. It may be a little tricky to work around zipper head. You’ll want to sew as close to the teeth as possible, so after sewing about an inch, pull zipper head back. (Note: You’ll move it back into position as you go along).
8. Right sides facing, take the other camo/leather piece and silk and lay it on top of the other side. Pin the free side of the zipper to these pieces along the raw edge.
9. Sew the zipper on.
10. Be sure to watch out for the zipper pull like in Step #7.
11. It’s time to sew it all together! Use straight pins to give yourself about a half inch seam allowance on the remaining three sides.
12. Go ahead and sew it all up.
13. Before you get to that last side….be sure to open up zipper a few inches so you can get it open once you are done sewing.
14. Cut corners of bag off at an angle on both sides.
15. Flip bag to the right side.
16. Take a piece of leather about 7.5 inches in length, and cut about 7 thin strips of leather for your tassel with the rotary cutter.
17. Fit leather strips through zipper head.
18. Take one leather strip and wrap it firmly around the head of the bundle of strips three times.
19. Hand stitch this binding strip to the bundle of strips for security. Cut off excess.
20. If your fabric is puckering at all, feel free to iron it out, applying a damp cloth over the leather portion.